10.30.2011

Celebrating/ DIY Bug 'em Treat Bags

Celebrating!  This is my 90th blog post since I started back in April.  And Keeping Up With My Joneses  reached over 4,000 page views last week.  Thank you for all the love and support and tuning in to read about my little slice of life!


Tomorrow night I've got a date with an owl and a shark to do some trick or treating, so we're starting the week off early with a post tonight.  

DIY Bug 'em Treat Bags
Have you seen these?  Hallmark has these Bug 'em treat bags to fill up with cards and goodies, I've seen them around since Valentine's day.  They are so cute, but $10 a piece. SO......

I decided to make my own for the boys' Halloween surprise.  
Here's a quick photo tutorial, I think most of it is self explanatory.  All the pieces are made out of felt, hot glued together and then I stitched green, purple thread for an accent on the front.


They're packed full of chocolate pumpkins, smarties and a sucker for each boy.  Although Sage will get some help eating his!

Here's a step by step photo tutorial:


  We're not Buggin' Happy Halloween!


Looking forward to this treat for the adults after trick or treating......
Cookies n' Cream Cheesecake
Have a fun and safe night!

10.27.2011

A Look Back: More DIY Halloween Costumes

Wednesday's post showcased the boys' Halloween Costumes for this year.  But here's a look at years past:

Franken- Cy
Cy's 2nd Halloween (he was about 18 months old) he went as Frankenstein or as we called him Franken-Cy!
Black shoes, sweat pants and the jacket is made out of a 2T long sleeve top.  I cut the front down the center and shaped it like a jacket or blazer with a collar made out of felt.  I think it had little pockets too.  
My favorite thing that you can't see is the lined inside in purple leopard print and the funky purple, green buttons down the front you can see.  His head/ hat was made out of bright green fleece.  I used a hat he had as a template.  There's a little "pillow" at the top inside for the high Frankenstein forehead.   Black felt hair piece cut and glued on.  The bolts are corks painted silver.

The next year Cy got to pick whatever he wanted to be.  He picked Swiper from Dora.  Here he is trick or treating at Wegmans.

For the body of the costume I made a jumpsuit out of orange fabric, there's a slit in the back and two ties to hold it together.  Yellow fabric was added for the belly.  The hat is the same orange fabric made into a bonnet hat with ties.  
 Swiper's face was made at the top of the hat using the yellow and orange fabric, white felt, blue fabric and puffy paints.  I started with the yellow nose shape, which has teeth attached and sized/ shaped the rest around it.  Blue gloves finished off the outfit.  That's Max the Gorilla with Swiper before trick or treating!

And last year we had Toy Story inspiration.  Woody and the Alien.


  Cy as Woody.  It was great we used jeans and a yellow shirt with some touch up and accessories.  I made the vest out of white fleece with black cow spots in fleece, with black thread to finish the edges.  

Cy's belt, holster and boots are made out of a stiffer brown felt.  Boots just slip over his shoes the belt buckle is gold sparkle foam hot glued together.  With puffy paint I added the thin strip lines and painted "buttons" down the front.  Hat and bandana complete Woody. 

Lil' baby Sage was only a couple months old last year.  Cy picked the Alien from Toy Story for his new little brother.  His outfit is actually made from a 2T tshirt, you can see it laying on the floor in that first shot of Cy as Woody above. 

I kept the collar and top hem, trimming in the arms and making the bottom of the shirt into two legs.  The planet on the shirt is painted on.  The hat and little mittens are made out of bright green fleece (which was left over from Cy's frankenstein costume 2 years ago!)  The hat is a little cap or beanie with the antenna and ears sewn on, googly eyes glued and puffy paint smile. 

If you couldn't tell we really like Halloween and getting ready for Halloween in our house!

10.26.2011

DIY Halloween Costumes

We interrupt Wednesday's regular explore art post for this year's DIY Halloween costumes!


I got the boys' costumes finished, on time only because we had a costume party over the weekend.  There was a lot of last minute glueing and sewing going on Saturday morning.  I'd like to introduce:

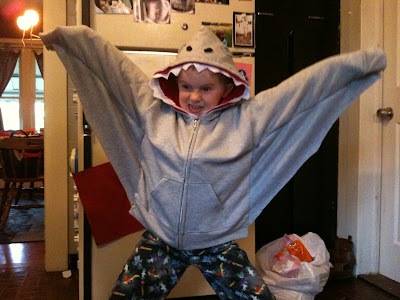
Cyrus as the Shark

Sage as the Owl

I'll have to update with some better photos.  Cy the Shark is half in his pajamas and well I crawled around on the floor for 20 minutes trying to get a shoot of Sage with his hat on.  This is what we got.  Here's a project break down on each costume:


Shark Costume:
  • Gray hoodie and sweat pants
  • 1/2 yard gray fleece
  • 3/4 yard red fleece
  • black felt and white felt
  • googly eyes
 I lined the inside of the hood with red fleece to look like the inside of the mouth.  Fold the hood so that it is on a profile view and trace out your shape in the fleece.  I cut and sewed the back hem, tacking it into the back of the hood.  For the teeth I measured the length I'd need in white felt around the open edge.  Cut the width about 2 1/2 inches to leave enough room to sew or glue in the hood.  Taking scissors I cut out triangles to look like jagged, sharp teeth.

Tuck the white, teeth felt piece in between the hood and red lining to "hide" the edge of the teeth once everythings sewn together.  You could hot glue or hand stitch them in place.
 Next I worked on fin shapes.  I cut the dorsal fin out of card board and then traced it onto two pieces of gray fleece.  Sew them together to make a cover for the card board fin.

I hot glued the dorsal fin onto the back center of the hoodie.  Once it was glued in place I then pinned and hand stitched the fleece edges down.  


For the fins on the arms of the hoodie, I laid the hoodie out flat measuring the length of the sleeve and then down the side of the hoodie.  Pinning everything in place along the sleeve and side I sewed the fins in place.


Last is the face of the shark on the hood.  We needed eyes, nostrils and gills.  Using the black felt I cut nostril ovals and long slits for the gills.  A few scraps of gray fleece were cut to lay over the googly eyes.  Hot glue everything in place and .......


Viola!  Pair with gray sweat pants on you have a DIY shark costume!


 Owl Costume:
  • 1 yard white cotton fabric
  • 1 yard colored fabric for  lining
  • scrap fabric
  • crocheted owl hat (courtesy of my sister!)
Sage's costume was inspired by this tutorial on how to make children's bird wings. 

To get the wing shape I took a long sleeve onesie, measuring the sleeve length and down the side.  At the right angle it forms cut a straight line for the top and side of the wing, then cutting an arc for the bottom.  If you lay two pieces of white fabric down and cut them together you'll save time and have two identical wings.

For the feathers I took 5-6 different fabrics I had in scraps and cut out this oval shape with a flat top.  Fold your fabrics over several times and trace your shape this will save on time, having to cut out each separate shape!  I didn't count how many I cut out but I filled a sandwich bag full and I had plenty left over.


I don't get my sewing machine out much with an active 1 year old and I didn't want to hand stitch every piece on.  So with my assistant Cyrus we laid the "feathers" out and I hot glued the in place.  Start from the bottom and lay each new layer over the next this will hide your ends.


I cut out orange fabric for a lining on the other side of the wings.  Trace the white fabric wing shape.  Again I wasn't in the mood to sew, so I hot glued the edges of the white fabric over the orange lining.

There's a few things to finish off the costume.  I took the left over "feather" fabric pieces and hot glued them to this onesie which provided something to attach the wings to.  The original project calls for attaching a piece of fabric to tie around the neck.  This would not go over well with Sage.  And at the end of the arm, wing span attach elastic or I used pieces of white felt (scraps from Cy's costume) that will slip over their wrists and create that wing look.

My sister made this beautiful owl hat that that really finishes off the whole costume.  Now if we could only get Sage to keep it on his head!  


Not sure what Sage thinks of the costume or thinks it is.  He kept covering himself up with the wings and then was rolling/ hiding in it on the floor. 

So there's our DIY Halloween Costumes for 2011!  They've survived a 5 year olds birthday party so far, 2 days of tricking treating and school parade left.  Then we'll have new additions to the dress up basket in their play room.

Stop back Friday for a run down of all my DIY Halloween costumes, I'm digging out old photos!

10.24.2011

Adventures of Shopping with Small Children

This is a picture of Sage "helping" put away the groceries Sunday afternoon, after we survived our weekly Wegman's grocery trip.

I say survive because shopping with young children is always an adventure that at some points you might wonder if you'll survive.  My theory is within the first 5 minutes you know what kind of trip you're in for whether the good, bad or the ugly.

An essential tool for shopping with children is the shopping cart.  Not only does it give you somewhere to put the items you are going to purchase but it also contains and restraints your children.  

Although you can encounter problems with this tool.  Like when you get to the store and go to pull a cart away from the row of carts and you realize it's stuck.  Nothing like trying to pull carts apart while holding a child, a handful of reusable bags and trying to make sure your other child doesn't run off.  Or you get the squeaky cart and about half way through the store you are about ready to loose your mind.

Once you're in the store there are about 3 types of misbehaving children, which most children including mine have been on numerous occasions.  

Sage got his first sucker over the weekend, he sure remembered what it was as we passed them grocery shopping.  Did he scream!
The screamer, whether they are screaming for something they want or just screaming.  When Cy was about 18 months old he went through a phase that when ever we got into a store he would just open his mouth and scream.  Really for no reason, searching for something to do I'd put my hand over his mouth and make a dash for the door.
Cy is my whiner, but we set expectations for him with a little reward like a quarter ride if he's good.
The whiner, this usually because they want something, are tired or bored.  Sage hasn't fully discovered yet that if he whines he'll get something.  (I know it's terrible but you have to admit you've done it) He is the whiner because he's tired, bored and does not want to be in that cart.  He'll whine from one end of the store to the other, usually only appeased by snacks/ food.

The third type is the runner/grabber.  On the occasion when there isn't a shopping cart available or you've had a temporary lapse in sanity and let your children walk in a store this can happen.  

Friday afternoon we made a stop at Rite Aid to pick up a script for Cy, big surprise it wasn't ready.  So we amused ourselves by looking at Halloween and Christmas decorations.  The interest was lost before the script was ready.  My kids we loose in the toy aisle and soon enough loose in the whole store.  Sage is a grabber, he'll grab and knock over anything at his level.  He also turned out to be a runner at the same time Cy did and one went one way the other well, the other way.  Needless to say we left without the script. 


They are cute but boy will they tag team you and any given second.
Now when encountering any of these types of children in a store you can pick out the parents and non-parents.  Fellow parents give you that sympathetic glance and slight smile, saying been there done that.  Non-parents give you the look of disgust like you need to control your child. 

Sunday's grocery trip we crossed paths with a few other moms as Sage was in a I want to throw everything on the floor mood.  Not the best mood when grocery shopping on the busiest day and time of the week.  I was picking up items a couple times every aisle, and as I would say NO, NO, NO he'd mimic me in his little baby voice.  Which got a few giggles from fellow shoppers.  

More than 3/4 way through the store we, I realized we were short and shoe and a bagel.  10 minutes of back tracking I summed up they were both a loss until a lady came around the corner looking for someone with a little child that matched a shoe she found.  She had to have been a mom, who else would have spent the time. 

So thankful for those who understand the "adventures" of shopping with small children.

10.21.2011

Friday Fun Finds

Halloween Craft and Treats
to go with Wednesday's "stain glass" spiderwebs here's some fun finds

Milk Jug Skeleton complete tutorial from thepartyanimal.com

Pumpkin Rock Art from candiceashementart.blogspot.com

Mummy TP roll from busybeeskidscrafts

These are too cute Owl Cupcakes from 6 Bittersweets

MMM.... chocolate candy corn cookie Bakeat350

Salty and Sweet Halloween Bark from crystalandcomp
great idea for left over candy, that is if you have any

LinkWithin

Related Posts Plugin for WordPress, Blogger...