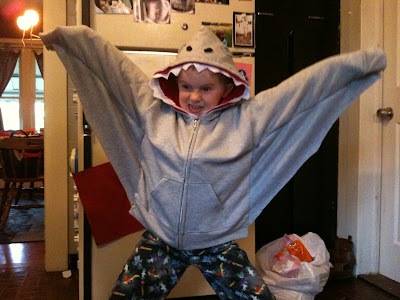
I got the boys' costumes finished, on time only because we had a costume party over the weekend. There was a lot of last minute glueing and sewing going on Saturday morning. I'd like to introduce:
Cyrus as the Shark
Sage as the Owl
I'll have to update with some better photos. Cy the Shark is half in his pajamas and well I crawled around on the floor for 20 minutes trying to get a shoot of Sage with his hat on. This is what we got. Here's a project break down on each costume:
Shark Costume:
- Gray hoodie and sweat pants
- 1/2 yard gray fleece
- 3/4 yard red fleece
- black felt and white felt
- googly eyes
I lined the inside of the hood with red fleece to look like the inside of the mouth. Fold the hood so that it is on a profile view and trace out your shape in the fleece. I cut and sewed the back hem, tacking it into the back of the hood. For the teeth I measured the length I'd need in white felt around the open edge. Cut the width about 2 1/2 inches to leave enough room to sew or glue in the hood. Taking scissors I cut out triangles to look like jagged, sharp teeth.
Tuck the white, teeth felt piece in between the hood and red lining to "hide" the edge of the teeth once everythings sewn together. You could hot glue or hand stitch them in place.
Tuck the white, teeth felt piece in between the hood and red lining to "hide" the edge of the teeth once everythings sewn together. You could hot glue or hand stitch them in place.
Next I worked on fin shapes. I cut the dorsal fin out of card board and then traced it onto two pieces of gray fleece. Sew them together to make a cover for the card board fin.
I hot glued the dorsal fin onto the back center of the hoodie. Once it was glued in place I then pinned and hand stitched the fleece edges down.
For the fins on the arms of the hoodie, I laid the hoodie out flat measuring the length of the sleeve and then down the side of the hoodie. Pinning everything in place along the sleeve and side I sewed the fins in place.
Last is the face of the shark on the hood. We needed eyes, nostrils and gills. Using the black felt I cut nostril ovals and long slits for the gills. A few scraps of gray fleece were cut to lay over the googly eyes. Hot glue everything in place and .......
Viola! Pair with gray sweat pants on you have a DIY shark costume!
Owl Costume:
- 1 yard white cotton fabric
- 1 yard colored fabric for lining
- scrap fabric
- crocheted owl hat (courtesy of my sister!)
Sage's costume was inspired by this tutorial on how to make children's bird wings.
For the feathers I took 5-6 different fabrics I had in scraps and cut out this oval shape with a flat top. Fold your fabrics over several times and trace your shape this will save on time, having to cut out each separate shape! I didn't count how many I cut out but I filled a sandwich bag full and I had plenty left over.
I don't get my sewing machine out much with an active 1 year old and I didn't want to hand stitch every piece on. So with my assistant Cyrus we laid the "feathers" out and I hot glued the in place. Start from the bottom and lay each new layer over the next this will hide your ends.
I cut out orange fabric for a lining on the other side of the wings. Trace the white fabric wing shape. Again I wasn't in the mood to sew, so I hot glued the edges of the white fabric over the orange lining.
There's a few things to finish off the costume. I took the left over "feather" fabric pieces and hot glued them to this onesie which provided something to attach the wings to. The original project calls for attaching a piece of fabric to tie around the neck. This would not go over well with Sage. And at the end of the arm, wing span attach elastic or I used pieces of white felt (scraps from Cy's costume) that will slip over their wrists and create that wing look.
My sister made this beautiful owl hat that that really finishes off the whole costume. Now if we could only get Sage to keep it on his head!
Not sure what Sage thinks of the costume or thinks it is. He kept covering himself up with the wings and then was rolling/ hiding in it on the floor.
So there's our DIY Halloween Costumes for 2011! They've survived a 5 year olds birthday party so far, 2 days of tricking treating and school parade left. Then we'll have new additions to the dress up basket in their play room.
Stop back Friday for a run down of all my DIY Halloween costumes, I'm digging out old photos!
Stop back Friday for a run down of all my DIY Halloween costumes, I'm digging out old photos!


I love the costumes, what great ideas! They are so unique and very cool.
ReplyDeleteThanks it's fun to come up with costume ideas every year, the past 3 years my oldest has gotten to pick his. Then it's just a matter of figuring out how to make them!
ReplyDeleteThis is awesome. Thank you.
ReplyDelete